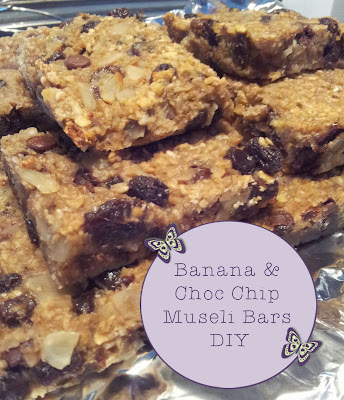
Banana & Choc Chip Muesli Bars - Make Your Own

Make your own banana and chocolate chip muesli bars
I have to admit I do like to snack and chocolate is my weakness, if you are like me and are looking for healthy snacks but to help with the chocolate craving give these easy to make Banana and Chocolate Chip Muesli Cereal Bars a go. These bars are also a way to use up bananas you might have thrown away because their skins went a little brown or they got a bit bruised.

To make your muesli bars you will need:

* Three bananas
* 2 cups of rolled oats
* One cup of apple juice
* One cup of raisins or sultanas
* 1/2 cup dark chocolate chips
* 3 tablsepoons of sunflower seeds

And this is how you make your yummy snack:

*Mash two bananas in a bowl with a fork then add another banana which has been chopped into small pieces,

*Add to the bowl two cups of rolled oats, one cup of apple juice and one cup of raisins (or sultanas if you prefer)

*Mix the ingredients together well and then add the 1/2 cup of dark chocolate chips and the 3 tablespoons of sunflower seeds.

*Line a baking in with baking parchment and spread the mixture to about 2cm thick.

*Baked in the oven for 15-20 mins on 180C/Gas4

*Once cooled, remove from the tin and cut into the desired size bar and store in an air tight container. I usually cut them into 2" squares.

When I have made these cereal bars I find they need to be eaten within a week because of the banana in the mixture. If you had school children these would be a great snack to whip up ready for their lunch boxes the following day.


Friday 27 September 2013 | 0 Comments

Learning Lino Printing

Lino print tea towelI have wanted to try out a few new crafts recently just to see if anything else takes my fancy and one of those was Lino Printing so when I saw local craft workshop Betty Makes, from Newmarket, was running an evening workshop I jumped at the chance to book. Being a bit of a nervous type I didn't fancy going alone and so Holly from Ilex Made This came along with me.

Lino printing is a print making  technique in which a sheet of linoleum (sometimes mounted on a wooden block) is used for the relief surface. A design is cut into the linoleum surface with a sharp knife or V-shaped chisel with the raised (un-carved) areas representing a reversal (mirror image) of the parts to show printed. The linoleum sheet is inked with a brayer and then impressed onto paper or fabric.

Betty Makes is a lovely little studio room run by Jean-Mary and it is such a pretty place to be with craft materials displayed and a big table for the students to sit around. Classes fit up to eight but at this workshop is was just Holly and myself which meant we had lots of space to get messy!

Lino print card workshop at Betty MakesJean-Mary started off by talking us through what we would be doing - drawing out a design on to paper, transferring it to the lino and using tools to cut it out, and then printing on to our blank tea towel. As it was just Holly and I we also had time to print a couple of cards and Jean-Mary explained the different paints to use on paper rather than fabric.

Now, I am the first to admit that I am AWFUL at drawing, I even struggle with stick men, and so I may have cheated slightly and took along some of my paper-crafting stamps for inspiration. Once I decided upon the butterfly I traced the design on the stamp packaging and used that, but I don't mind, I think it came out great!


I am pleased with the design around the tea towel and may use this as part of a Christmas hamper as a gift at Christmas. I also made two cards and prefer this one with two butterflies in the corners rather than the one big butterfly which is on the other card.


Holly did great drawing her baking utensils from scratch and I love the design she made in bright colours.

We both really enjoyed the workshop and I think we may both have a go at this technique again, but if not, I can still see me returning to Betty Makes to attend more workshops!

If you would like to have a go at Lino Printing why not take a look at the Betty Makes schedule?

(This is not a paid post, I just love what Jean-Mary is setting up with craft workshops)
Monday 23 September 2013 | 0 Comments

Vanilla Essence - DIY Tutorial to make your own

Make your own vanilla essence tutorial
If you're a keen baker I would guess you have a bottle of vanilla essence in your cupboard, but have you ever thought how easy it is to make your own Vanilla essence?

I hadn't, but last Christmas I was on a mission to make as many of my Christmas gifts as possible, because I love handmade and crafting but also because I think something handmade has more of a personal value and no time is this more prevalent than Christmas

I decided to make up some hampers for family and combine lots of handmade goodies and one of the elements I made was handmade vanilla essence. It was so easy to DIY that I also made up a sneaky batch for myself and I have been using it throughout the year in my cake baking as its much nicer than those tiny shop bought bottles and lasts longer.

If you think this might be something you would like to make as Christmas gifts I would suggest making it soon as it needs to steep for at least six weeks to get a strong vanilla flavour.

To make your own Vanilla Essence you will need:
10-12 vanilla pods per bottle - I bought mine here
250ml Glass bottles - I bought Kilner ones here
Vodka
Knife

How to make your own vanilla essence
DIY vanilla essence
The first thing to do is sterilise the bottles - I did this in the dishwasher with no detergent and then leave the bottles to air dry overnight.

The next stage can get a bit messy! You need to run the knife along the length of the vanilla pod and scrape out the seeds, leave them on the pod but not trapped in side. As you scrape each pod put it in the glass bottle, its okay if the seeds fall off in the bottle.

Repeat this for all of the pods, I managed to get 11 in each bottle.

Fill with vodka, seal the lid and give it a really good shake.

Store in a cool dark place for at least six weeks or longer but each week give the bottles a gentle shake to mix up the essence. Eventually the vodka will turn a gorgeous shade of brown and smell delicious!


Friday 20 September 2013 | 0 Comments

Distress Ink Colour Chart - How To

Like many crafters I love my Tim Holtz Distress Inks for papercrafting and I have collected quite a few from the various ranges.

I love Distress Inks because they are great for stamping but also painting with if you use a water brush.

The problem however with the inks is that you cannot get a true colour representation from the lid of the ink pad. To rectify this, I decided to make a colour swatch which I will keep with my inks and can reference when stamping but something that I could also add to as I purchase more inks - which I most definitely will! The colours all together just look so pretty!

To make a colour swatch like this one you will need:

1. First of all punch out the shape of your choice in the white stamping card for how ever many inks you have.
2. Using the blending sheet and the blending tool ink the card shapes making it darker around the edges and gradually lighter in the centre so that you can see the range of colour shades you can create with one ink pad. 
3. Using the rubber stamp, stamp the image in the centre of each colour swatch so that you can see what a stamp in each colour will look like.
4. Write the name of the ink colour along the edge of the card shape.
5. Repeat steps 2, 3 and 4 for each ink that you own.
6. Punch a hole in the corner of each shape.
7. Arrange the colours into groups - eg all the blues, greens etc and then tie a ribbon through to create a loop. Alternatively you could add the cards to a metal ring but I think a pretty purple ribbon is the best option!

I hope this will be a helpful addition to your craft organisation techniques and save you a little time with knowing exactly what the colours will look like!

Sunday 15 September 2013 | 0 Comments

Autumn Card Challenge

I think it is a sad but true fact that Autumn is on its way with the chilly and wet weather we have been experiencing in Cambridge this past week, I am thankful for my heater next to my desk at work! Although I dont like the cold weather, I do love the colours that come with Autumn and the beautiful oranges and reds on the trees when the leaves turn.

With this in mind I was really pleased to see that fantastic card stockist Papermill Direct have created an Autumn themed challenge with the winner becoming part of their design team. You can read more about the challenge over on their blog.

For the challenge we have to create something that represents Autumn and I came up with this card (and then whilst in a card making moment I made the second card too!).


The card is A5 in size with a cream base and I firstly made mask cutouts of the leaf stamps and inked through the cut outs on to smaller squares of card edging with distress ink, and then stamped the leaves  with brown embossing powder to give an overlapped appearance and showing the veins of the leaves. The panel of text started as plain brown card which I then stamped with the Autumn themed text stamp in an embossing powder with a sheen so it shows up and shines. Finishing with a tied ribbon.


Whilst my mind was thinking of Autumn themed cards I also came up with this card using a brayering technique and embossed backing card which I think is really pretty.


 Wish me luck in the challenge!!!


Friday 13 September 2013 | 0 Comments